
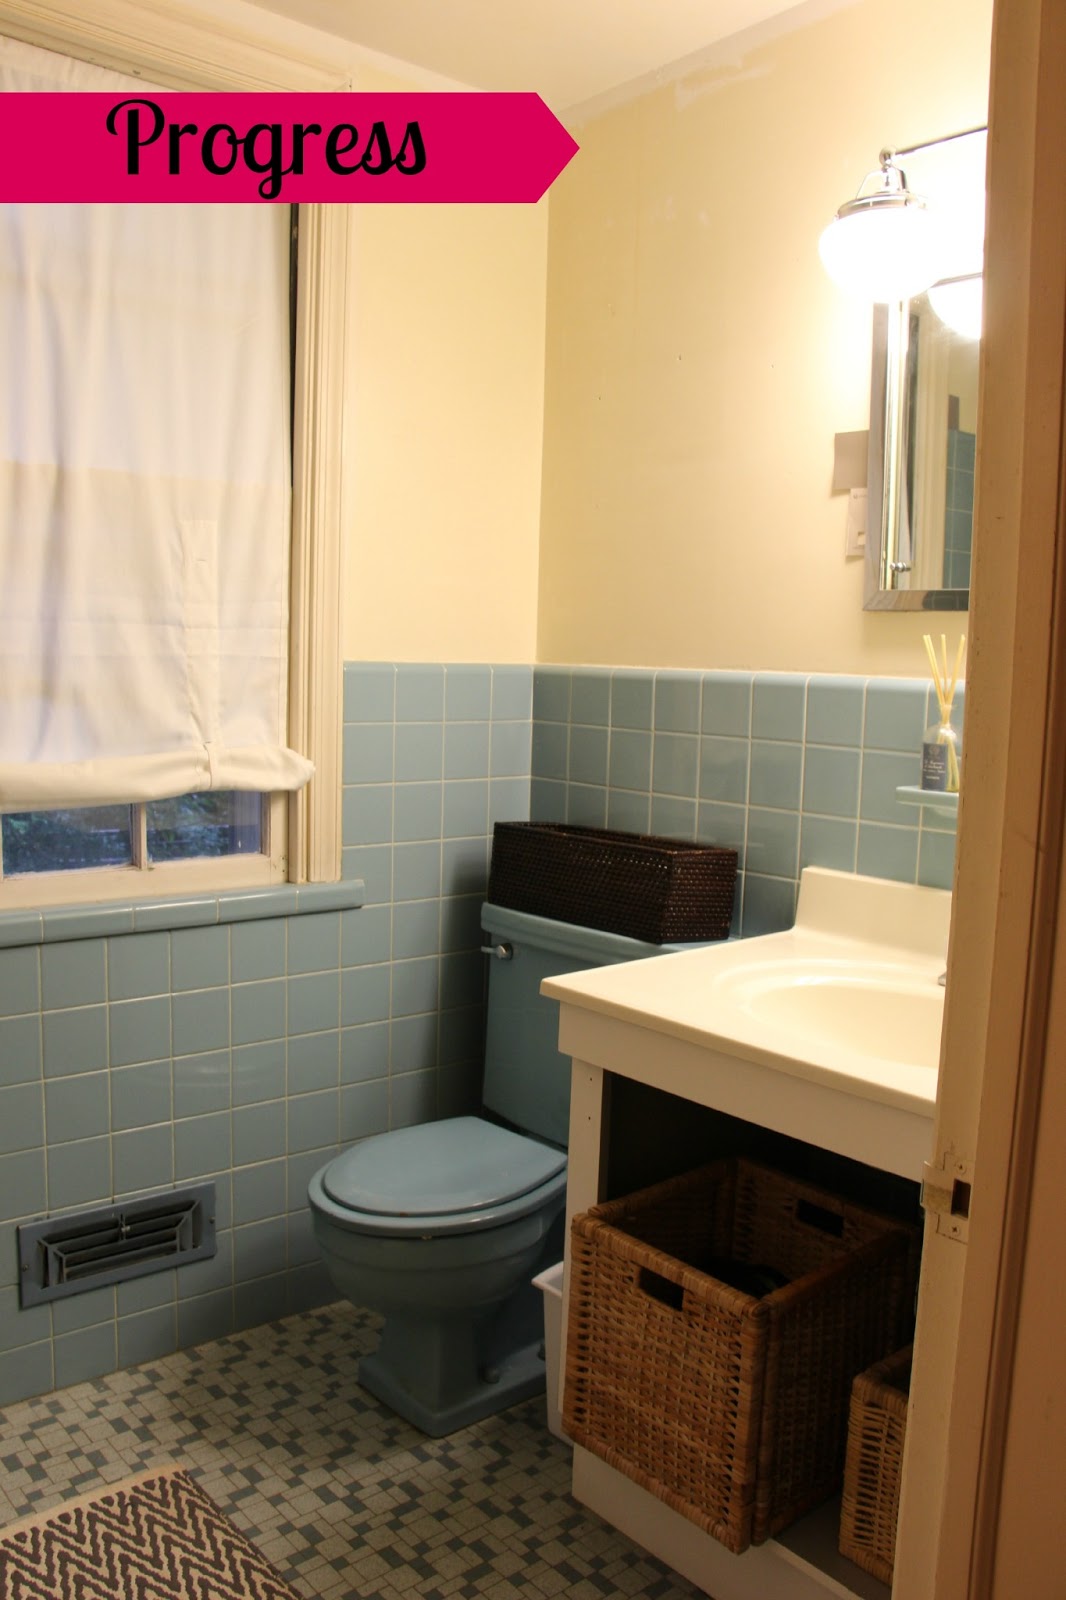
It thought it could, it thought it could, but, honestly, we just couldn't.... The blue bathroom just finally had to go.
Our house was built in the mid-50s which meant that every bathroom had to have its own color code. I guess saying "our bath" or "the hall bath" was too confusing of terminology back then so they just had to color code them all.
Apparently American Standard went crazy with the color coded bathroom and thus they were in every house in America during a housing boom. Well, now I am sure pink and blue toilets make up a good portion of construction waste...


I guess it works as long as your sash matches...
So while it was in good shape, it had to go. And the guest/hall bath was first because 1) it was a huge embarrassment to guests, 2) we may have little ones soon and we wanted to get that done in advance, and 3) it was just depressing to come up the stairs every day and see that at the end of the hall
So in early Feb, we decided to finally start. (Took me like 6 months to figure out which shade of white subway tile I wanted, otherwise we would have started last year. And, yes, there are different shades of white subway tile...)
And just to remind you of what Big Blue looked like...
When we bought it...

After move-in and a lot of wallpaper removal (including the damn ceiling, because that makes sense)....

Step 1 - Demo Day!
As most projects go, D-Day started on a weekend when I was at work. Actually, it started, and was basically finished when I was at work. Bill rented a jackhammer to do the tile, discovered it worked, and powered through a really rough 2 days of removing all the tile, mortar, and lathe in about 15 hours...

No going back now!


To most people's surprise and/or admonishment, we left the blue tub. While I didn't like the style or color of the tiles in there, there was definitely something not-great feeling about removing all of that perfectly-installed, in-good shape tile that made it for so long, just because it no longer was stylish.
So we drew the line at the tub. First off, its a solid cast iron tub that we couldn't afford to replace with anything similar today. Also, its a solid tub. It would have been a nightmare to remove. Lastly, it would have probably doubled our budget to get a new tub in there.
So, we went with it!
Step 2 - Get rid of all that stuff

Bill carried a lot of it down in bags, but some of it went out the window (post puppy scouting)


Rented a Home Depot truck for an hour, Bill loaded everything up (with pretty much zero help from my weak self) and we went to the construction dump.
Let me just say thank god Bill had been to this dump previously. Its intimidating. Its like the dodgeball of DIY work.
You pull up, the only people there are full-time construction workers who are driving giant trucks and bulldozers and no one 'greets' you to tell you what to do - you just know or you don't. Luckily, if you do know, or your husband does, then its pretty quick, and crazy cheap!
Just over a ton of debris in garbage bags!

Step 3 - Put them walls back
So you have to learn a little something every time you do a project, otherwise, what's the point?!
This time, we learned about 'packing' out walls to make them 'plumb'. Oh jargon....
Apparently the old walls were done with this not-quite-but-pretty-close plaster-esque material over lathe, which meant it could be sculpted. Like over things that aren't straight...

Yeah, that's the sewer stack (for your poo!) and its round... and bumps out a bit.
Didn't quite realize that as we were putting up the cement board and then we saw a little bump.
Not a big deal except we were tiling over it, and tiling over rounded surfaces doesn't make for a good look.
We then learned all about packing out walls, which is the appropriate way to make your walls straight again.
But we didn't do that. Of course not. We just sort of cut into the cement board and tried to make it flatter.
Ta-da!

(you can see little waves in the tile!)
Luckily this was on the wall covered by the toilet and sink so we knew most of our mistake was going to be covered.
And we did a better job on the other walls, some of which needed to be packed out a but, but none of which were over big bump-out bits of cast iron pipes.
Bill did have to do some fun plumbing to get the new faucets ready...

Cutting the cement board was a little bit of a pain, but overall was an easier part of the job.
P.s. You have to use cement board in showers - not 'green board'. Green board is still drywall, its just got some moisture protection, meaning its good for behind sinks, backsplashes, other bathroom walls, etc. Its not water-resistant and can't be used in the shower.
Step 4 - Waterproof!!
So speaking of what you SHOULD put in the shower... you have to waterproof!
Apparently, most showers in America aren't waterproofed. Its part of code in most European countries but here, we tend to think tile is good enough. But you have to have something under that tile to keep moisture at bay when the water will inevitably get behind the grout/caulk.
We ended up using this pretty great stuff called Schluter Kerdi. Its like wallpaper, but its a water proof membrane system you get to 'paste' on. It comes with all kinds of extra products you can use too, like a sealer for corners, little tape pieces, and round fittings for faucets. You can go crazy with all of their well-thought-out products, but we just used the membrane on rolls, their mortar, and their glue (called Fix).

Its literally like putting on wallpaper.
Pretty easy too. Cutting the sheets is easy, its just hanging that might cause you to curse a couple times. ;-)
Step 5 - Wall tile!
With the walls pretty ready to go and plumbing in place, next up was tiling. In other words, we were only maybe half way done.
We planned to tile up 2/3 of the wall and all the way to the ceiling in the shower. We chose subway tiles that don't need spacers, thank god. Many subway tiles have built-in spacers on their edges so you can automatically have a grout line and proper spacing without having to measure and space each tile (which would have taken us even more of forever!).
We also had border tiles - a 'quarter round'-looking edger and chair rail that we planned to finish each edge with - and another accent subway tile. That latter one was a special buy. Its a vintage find from a salvage shop that apparently used to be use to surround Victorian fireplace fronts! Its this gorgeous aqua-blue cracked glaze tile. The downside was we only had so many that we could find to work with so it meant getting very precise and creative with spacing along the borders.

Tiling was a learning experience for sure. Bill had some experience from helping with our kitchen floor. But these were a different beast. Smaller, more manageable, but lots more planning!
I won't go into major detail here, but a few take aways...
1) You HAVE to start with a ledger board at the bottom! You can't just start at the floor and go up - it will get all wonky!
A legder board helps you start with a perfectly straight row you can work up from.

(see the board at the bottom? Its straight!)
2) Don't get a handheld cutter - its trash. Buy or rent a wet saw.
If you are really smart, you'll find a nice spot to locally put your wet saw.
We didn't have that so we had to run up and down the steps into the garage for every single cut. Most of this project was spent walking to and from the garage.

Lots and lots and lots of subway tiles to cut. Don't use that handheld thing in the top corner.

A wet saw! So easy, I can do it!
3) Watch lots and lots of Sal.
Oh, man. Good ol' Sal. Thank God we found this guy on YouTube!
There are zillions of how-to videos on tiling, but we found this guy early on and fell in love. He's a serious craftsman - no cheap way around doing things for him. He has about a trillion videos on how to tile and I would advise watching as many as possible! We pretty much learned everything from him.
4) (White) Grout covers a lot of evils.
We had some spots we thought were going to look a little odd in the end, but once the white grout went on the white subway tile, all the wonky lines were (relatively) erased! Obviously, if you use dark grout on tiles, which is popular right now, then things get more obvious.


So many tiles!!

See those lines go bye-bye?!

Even the border tiles look finished with the grout!
Step 6 - Floor Tile
So actually, before we grouted and technically before we even finished the wall tile (removed the ledger boards and left a blank row at the bottom), we started the floor tile.
The floor tile was done in marble hexagon tile that's made in sheets. So totally different tiling technique. Easier in that its fewer tiles, gravity is on your side, and the majority of spacing is done for you. Not so easy in that you have to perfectly space the sheets in a not-square room. Again, we turned to our friend Sal to figure out how to start, but like most floor tile jobs, you measure the middle of the room and start there.
First, you scribble lines on the floor, and then you dry fit everything to make sure it all makes sense before you cement it down.

But always leave room for your music speaker...
Once we measured 3 times, we cut once and did a final dry fit, numbered everyone, made a colorful diagram of the four quadrants of the room (because why not!?) and then got to actually cementing everything down.
Even after dry-fitting, we ended up having to eyeball some of the spacing when we were cementing them down. You have a few mins to wiggle things around before they set.
Some of the little tiles do pop off the sheets too, thus the handy blue-painters-tape.

This is actually the tile being dry-fit

Here its actually cemented down, I believe...
Lots of grouting was next, plus measuring and fitting that last row of wall tile that we had to do at the end.


Step 7 - Finishing Details!
With the tile done, we were in the home stretch. We just had to put humpty-dumpty back together again...

That meant putting the toilet back in, installing the vanity and sink I bought, installing the mirror on the wall (which was maybe the most curse-word inducing project of the whole rehab), paint the walls, add a new window sill (the old one was made of tile and we weren't that good), add a new wooden register cover, put the door back on (it was pretty in there without it, but probably not that practical...), reinstall the schoolhouse-style light we had, and add the finishing details like curtain rods and towel hangers.
Other than the mirror, we did all of this in a couple evenings one week with relative ease.
Which meant sometime in March, one random Thurs evening, all of a sudden our bathroom looked like this...


Whhhaaaaa?!?!?!
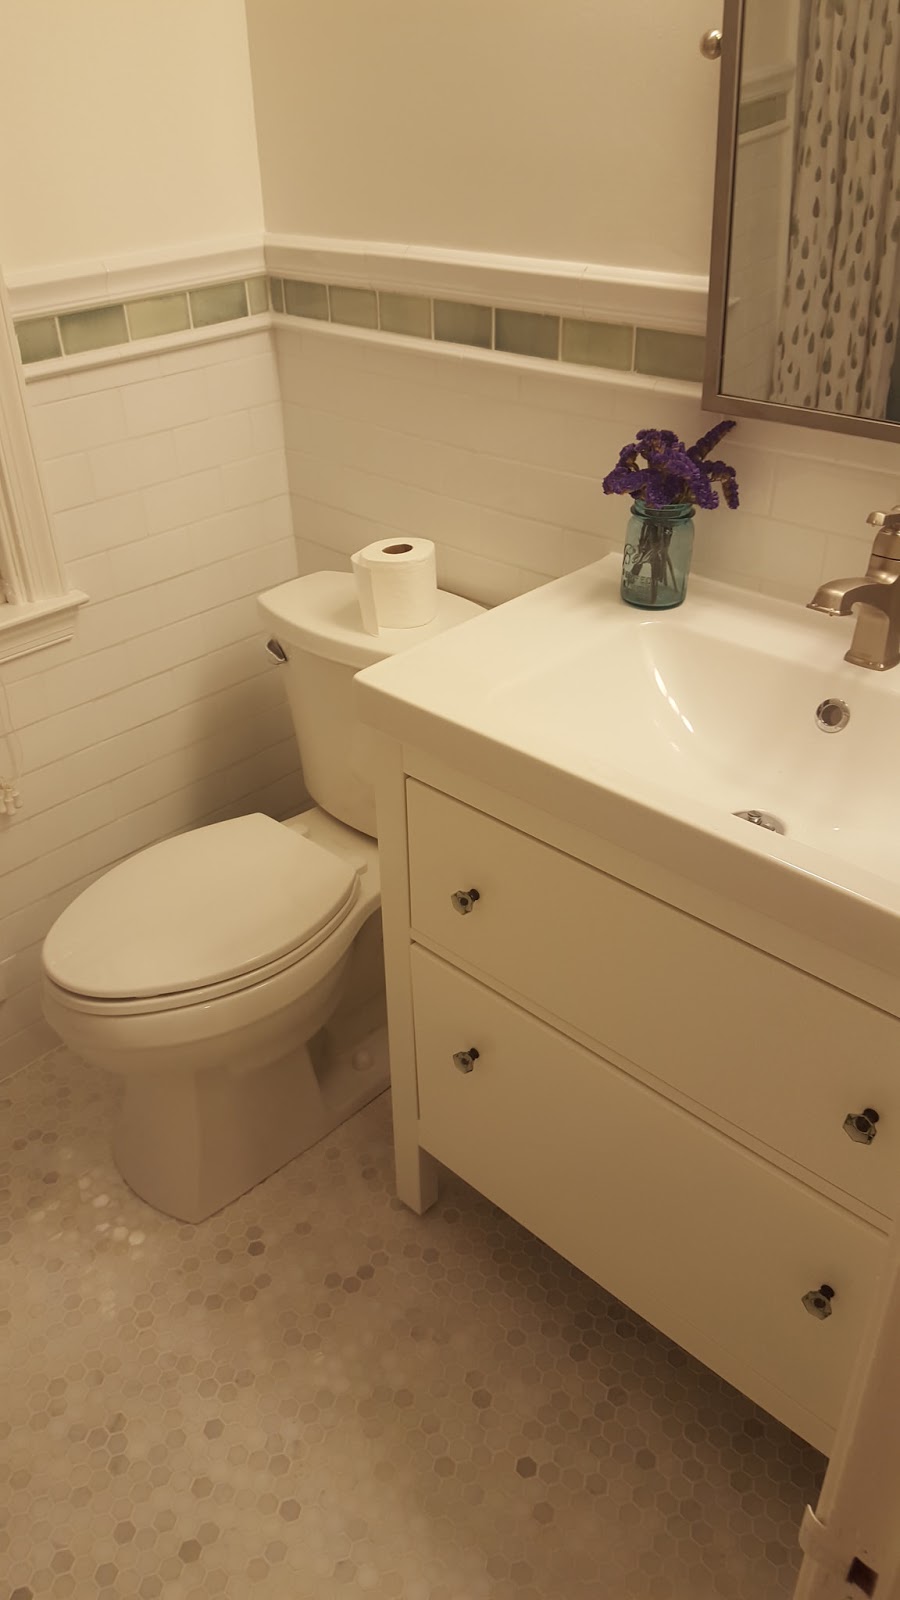
Yeah, in a matter of about a month and a half, we had gone from this...
To this...

(don't mind that this picture was actually taken before we finished the window..)
And.... drum roll, please.....
We did it all for a little under $2500....
According to some of our friends, this would have probably cost us $5-7,000 to have it done for us.
We honestly couldn't have been happier with the outcome. I even like the blue tub in there. It pops. It was a lot of work. We won't be doing our bathroom anytime soon now - we need to recover. But its doable! And we certainly learned a lot about major rehab work!
In the mean time, its sure nice to look down the hall and see this white, sparkling beauty now
----
For the full picture dump, see here!
Source list:
(All wall tile was the Jeffrey Court Allegro Gloss White collection from Home Depot)
Aqua accent tile is salvaged but Ebay has some similar stuff
New vanity drawer pulls (bought on sale at Target and they no longer carry them. But these are similar)
Bathroom vanity light (can't find original, but this is similar)
Shower Curtain (no longer available)